Translate

Thursday, March 15, 2012

Freezer Paper Applique' Technique in Pictures

Good morning!  It's not spring yet, but the birds are here.....robins, especially, doing their wild courtship flying.  My land, they are active.  What lovely sounds outside, even though the days are still chilly and rather dull in color.  One might almost wish for a little snow to brighten things up a little?  What can I be saying?

Today, I've prepared an applique'  lesson using the "freezer paper" method I like the best.  There are several different versions of this method online and you might want to shop around and try them out to see what suits you the best.  I'm using it in combination with the Fusible Webbing Applique' Technique in the block I'll be making today, from my pattern, "Eight Great Potholders", "Sue and Kitten".

Here's the page from the pattern.  Our fabric block, when finished, will be a mirror image of this drawing. 

Choose the fabrics you like for your Sue's clothing and background.  My background is white.  Her pinafore is striped, her dress is pink, her shoes and bonnet are blue.  The kitten is yellow.  Cut a piece of freezer paper (you can find freezer paper in almost any grocery store where they have paper supplies for wrapping food) a little larger than the drawing and trace each piece except the kitten.
Here is the drawing with the freezer paper overlaid.  Move the freezer paper around in order to make the best use of it in getting each piece traced out.  I usually add dotted lines to each piece where another piece overlaps.  Don't trace the kitten, yet.

  Cut out each piece and set aside.

A Little Bit of Fusible 

For the kitten, because it is a complex shape, I use double-sided fusible webbing. 


This time, I have Pellon 805 Wonder-Under but I've used other brands and weights.  This one works very well for me.  Trace the kitten, drawing on the paper-side of the webbing.  

Notice I've marked dotted lines on all my pattern pieces where other pieces will overlap, just as a reminder of where things are at as I'm going along. 

I've chosen a yellow print for our kitten, today, and ironed him, fuse-side down, to the wrong side of the fabric with a dry iron, pressing it for 5 seconds. 


  Then, I cut him out, carefully, without a seam allowance.  This is the only piece in the block that does not require a seam allowance to be added.  Where his little paw is shown in the middle of his chest, I cut on its outline so that it can drape over Sue's hand and arm in the final product. 

Back to the Freezer Paper


Iron your freezer paper shapes, shiny (or wax) side down, to the WRONG sides of your fabrics, being certain to leave room for a 1/4" seam allowance all around the outside of each piece.  I usually use the 5-second-rule on these, too, then give them a little extra press when finished.  Still, some of them come loose if they get a lot of handling.  You can actually press them again and they will stick.  Be careful not to scorch anything. 

Cut out all the pieces.

 Clip the convex curves a little but not too close to the paper.
 Using white thread (colored thread can leave dye on your pieces), baste all around the piece.
 Here is the piece, right side up, with the basting finished.  Notice I leave my knots and ends on the top of the piece for easy removal.
Here is the dress, basted.  Notice I haven't basted the side that will be under the Pinafore.

 Here is the pinafore basted, again, except for the part that will be under the bonnet.
Here are the shoes basted.  Notice i clipped deeply where the heels overlap one another.  You could make two shoes, to avoid having this rather complex shape and just stitch one overlapping the other.  It works.  Again, I've clipped the convex curve.

Now, I can lay out all my pieces on the block and mark the placement of the bottom-most piece, the shoes. I've used three little pencil marks just under the edge at the back, front and top of the shoes, so they won't show.

 I use glue to "baste" the pieces to the background.  Elmer's is fine, but there are nice fabric basting glues at your local quilt shop or online.  Use only a small dots.  Here, you see, I've used about 5 dots, being careful not to put any dabs on the basting thread or paper.  This is all you need.
 Press the shoes onto the background, paying attention to your little marks.  In about 10 minutes, it will be dry and you can go on to the next step, stitching.
 Here, I'm blind stitching the shoe in place.  Notice I've not turned the tops of the shoes under where they are overlapped by Sue's dress.
 Finished blind stitching.  Remove the basting from the front of the piece and pull the freezer paper out.
 Do the same with the dress.
 And blind stitch it in place.  Remove the basting and pull out the paper.

The pinafore is next in the layers.  Remove the basting and pull out the paper.

 I basted the hand under the sleeve in a couple of places on the back using the seam allowances that are there, just to keep the two together while I arranged the kitten..  Remove the basting and the freezer paper from the hand and the arm.   Dot the sleeve with glue and place it.  Don't glue the hand.  Don't fuse the kitten completely, yet, though, because his ear overlaps Sue's bonnet.  Just iron him to the background from the neck down.  This will help keep the hand in place until you get it and the sleeve blind stitched.  When fusing, be careful  so you don't scorch anything.  He only needs to be stuck tight enough for you to blanket stitch his edges.
With the hand and sleeve blind stitched in place, you can choose a floss you like for the kitten.  I used yellow, but a contrasting color would work, also.  I began blanket stitching the kitten at his overlapping right paw and stopped short of his ear.
 Glue and blind stitch the hat in place, letting the kitten's ear overlap it.  Then, finish the blanket stitching on the kitten and your block is done, except for embroidery details and embellishments.

 Here is the bonnet from the back of the block after the paper has been removed.  You can remove the paper from the bonnet by carefully cutting through the background to it from the back after taking out the basting thread.  Make a slit about 1" long and feel inside for the edge of the paper.  Work the paper out through the slit. 
Here she is, "Sue and Kitten". Next, I'll talk about embellishments for this Sue.   I think she's very sweet and hope you do too.  Let me hear from you about this kind of work.  Happy Stitching.


Tuesday, March 13, 2012

WE HAVE A WINNER!!!!!

JOSIE - You've won the free pattern "EIGHT GREAT POTHOLDERS".  Congratulations. Go to my site and email me from there with your snail-mail or e-mail address; I can send the pattern either way.   Thank you, everyone for entering.  Watch for our next give-away coming up soon.


Here is one of the Sues in the potholder set, "Sue With Her Doll"


And one of the Sams in the potholder set, "Sam and Puppy"

Happy Stitching!

Friday, March 9, 2012

"St. Patrick's Day and a Beautiful Song"

Anthony Kearns sings "Grace"

What's your favorite St. Patrick's Day song?


Wednesday, March 7, 2012


 I will be giving away a copy of

 the "Eight Great Potholders" pattern this 

week to someone whose name we draw 

from our readers who leave a comment (below 

the "Stem Stitch" post) by Midnight, PDT, Monday, 

March 12th, 2012.

To leave the comment, go to the bottom of the post and click on the word, "comments".


Monday, March 5, 2012


"Working the Stem Stitch in Embroidery"

It’s important, when using this stitch on appliqué, that you try to stitch through all layers, not just the top layer.  If you are stitching through just two layers, it’s easy.  More than that, will be harder, but try to go as deep as you can.  The stem stitch is great for, um, making stems….on plants and flowers….and little vines.  It’s also great for outlining almost anything, especially appliqué piece edges.  It’s great for “drawing” with thread to describe details of a piece such as how you see it in these pictures of the “Wilkommen”, from our pattern of the same name.   


It makes a nice twisted thread line on the surface of the piece.  Here’s how it’s done.

When I teach a class, I make up little samplers for the participants out of some simple materials.  I make each student an embroidery “hoop” out of tag board; two circles, basically, about 6” in diameter.  I staple these to opposites sides of a piece of white cotton cloth and draw some lines on it for them to follow.


Most any needle will do, but if you plan to continue to embroider with your appliqué, you will use a couple of different needles quite a lot.  The needle on the left is an embroidery needle.  The one on the right, is an appliqué needle. 


 Notice the size of the eye.  The embroidery needle has a large eye, which makes it good for using varying amounts and sizes of thread.  I usually use two strands, but for work that needs more bulk, up to six strands can be managed. 

By contrast, the appliqué needle is thin with a tiny eye, making it useful for working a single strand of strong thread in tiny stitches needed for the blind stitch used by most stitchers to anchor appliqué pieces.  It goes through several layers of fabric without too much trouble.  It’s also a little flexible, which is useful for maneuvering.  More on appliqué, itself, in another session.


"Oh, What a Tangled Web..."

To begin, one of the most frustrating problems for beginners is that of getting one or two strands of floss out of a skein without tangling up the whole thing. Here's how to overcome that little problem.


Pull about 18” of six-strand floss out from the skein and snip it off.  You don’t want to sew with a longer length  than this because it will wear out and break before you ever get down to the end of it.  Beside that, it tangles horribly.


So once the six-strand length is cut, hold the thread in your left hand, near the end you will thread through your needle, and pull one strand straight up and away from the bunch, holding back the strands that gather as the strand is pulled, with your other hand.  Lay the strand aside and smooth the remaining strands out straight again.  Then, pull another strand out the same way.  We will be using two for this project so that is all you will need here.  But, even if there are only two strands left of the hank, you still must separate them in this same way so they come untwisted from one another.


Moisten, trim and thread the two strands through the eye of the needle.  Always thread the end that came out of the skein or off the spool, first, through your needle.  Thread has a slight “nap” to it, according to how it is twisted during spinning.  Using the right end will prevent additional tangling and help your thread to be your friend and not your enemy.

For this exercise, you can make a knot in the end of the strands, if you like.  Later on, I’ll show you how to weave your thread ends into the back of your embroidery so that the back is smooth and almost as pretty as the front.  For appliquéd quilting, though, the back is never seen in the final product so knots are okay.


Bring the thread and needle to the front on the line of travel.


Insert the needle about 1/8” to 1/16” from the start point and bring it back up in the same hole made by bringing the thread to the front.

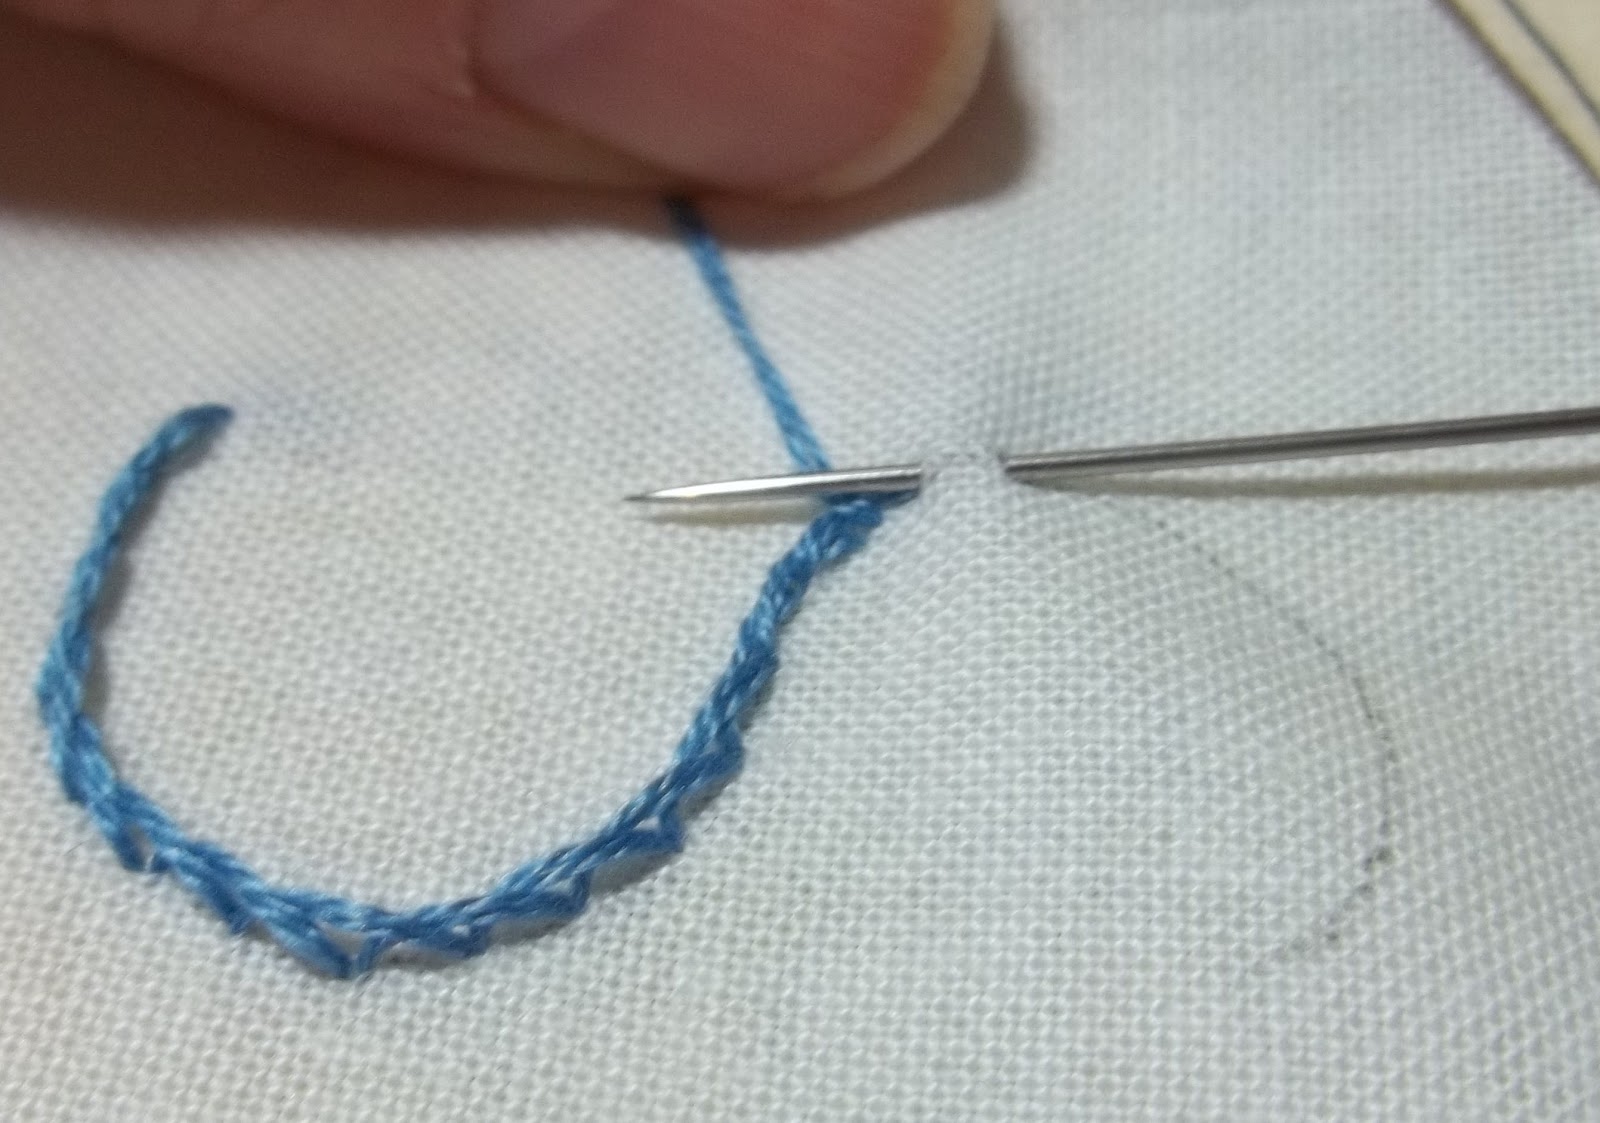
Tug the stitch firm and hold the working thread down below the line of travel.


Make your next stitch as before.


Continue on until you have finished the line or run out of thread.  Before you run out of thread, always be sure you have enough to take to the back of the work and weave through or make a knot.


Here is the back of the piece we just stitched.  This is how the back of the stem stitch looks.


Weave your remaining thread under the stitches on the back of the piece 6 or 7 times….enough to hold it and keep is from undoing itself.  Or just make a couple of half-hitch knots through the first stitch, if the back is not to be seen.


This is how the finished woven fix looks when done.  Snip off your thread close to the work….closer than I’m showing here, so the ends don’t show in the front as a shadow on the white background.


"Using the Stem Stitch on Curves"

The stem stitch works well on curves but I like it to have the same look on an inside curve as it does on an outside curve.  Draw an “S” on your sample fabric about 2” tall.  When you look at it, the first curve I am stitching on this “S” is an outside curve.  Holding the thread to the outside of the curve makes it lie down very nicely and it holds the line of travel very nicely.  But when you go around the other curve, at the top of the “S”, the stitch doesn’t look quite as good and doesn’t describe the line of travel quite as well.  I call the upper curve of the “S”, the inside curve, just for the sake of this demonstration.


To stitch the  inside curve (below), move your thread above the line of travel just before you begin the curve and continue as before, all the way to the end of the curve.  The transition is nearly invisible in the line of the stitch, and the inside curve looks as smooth as the outside curve.


The finished “S” with both curves lying quite smooth and sweet.  End of lesson.  Now, you can stem stitch to your heart’s content!!!


By the way, I will be giving away a copy of

 the "Eight Great Potholders" pattern this 

week to someone whose name we draw 

from our readers who leave a comment on 

this post by Midnight, PST, Monday, 

March 12th, 2012.


Here is a sampling of each potholder figure.....four are Sunbonnet Sue and four are Sunhat Sam.  These patterns can be used as quilt blocks as well as potholders.


To leave a post, just click on "COMMENTS", below.  Be sure and leave your name, so I can find your email address in my contacts list.  If you are not in my contacts list, you can email me your information by going to Prairie Cottage Corner using the link at the top right of this page.

Happy Stitching!!!