Translate

Thursday, July 31, 2014

Summer Trips - Lake Lenore Caves - And We Have A Winner!!!!

 We took a little trip recently over to Lake Lenore Caves, about 55 miles from our home in Odessa. The caves are situated in the Lower Grand Coulee. The Grand Coulee is a canyon that stretches from Grand Coulee Dam, south, to Soap Lake, WA. Entering from the south end, Lake Lenore Caves State Park is about 10 miles up into the coulee. You can find the map, below, at Metatropo. Metatropo also gives an overview of the hike and GPS.


From the parking lot at the park, looking south, you can see the north end of Lake Lenore. Lake Lenore is a highly alkaline lake where only one kind of game fish (Lahontan Cutthroat Trout) can be found. You can fly fish there througout the season. The lake is long and narrow and very pretty. To the south of it is Soap Lake, which is even more mineralized, supposedly with medicinal qualities.On the banks of Soap Lake is the town of the same name. Lovely spot.


Just on the way into the park is a small lake called Alkali Lake.

From the Washington Trails Association (WTA) site - Lake Lenore Caves were formed 12,000 years ago when the area was flooded by melting ice.  The caves were used by native tribes thousands of years ago for shelter. Today, visitors may view petroglyphs inside the caves. Seven caves are accessible by the maintained trail.


Looking up toward the caves, a trail leads away from the parking area. It's a pretty steep walk and the trail is a little rough, though paved, sort of. Not a hike for invalids, but okay for seniors in good physical condition, on a cool day.

More from the WTA site - Prairie falcons nest in the sheer cliffs of the Grand Coulee, and this route brings you close to them. Watch the majestic raptors soar over the coulees as they hunt for birds, small mammals, and reptiles--yes, there are reptiles aplenty here. Rattlesnakes, rubber boas, and bull snakes can all be found in the vicinity. Be especially alert as you near the cave entrances as the snakes frequently use the cool cave environments to help regulate their body temperatures in the heat of summer.


Looking across the coulee, the western side is steep with cliffs and miles of basalt shale. The west side drops almost straight down into the coulee while, on the east, the sides are often broken, open and less precipitous.

 And a last little bit from the WTA siteThe well-marked trail from the parking area leads to the series of caves, but while the caves are the primary draw to the area, don't forget to pay attention to what's outside them. In addition to the birds and other animals, enjoy the flora of the area. Look for desert shooting stars, which are thick along the trail. Also in evidence are nine-leaf desert parsley and fern-leaf desert parsley.


Some of the caves can be seen from the parking area.


You can see how one might be able to climb along the wall horizontally here and there, if one were something akin to a mountain goat.


Very picturesque.


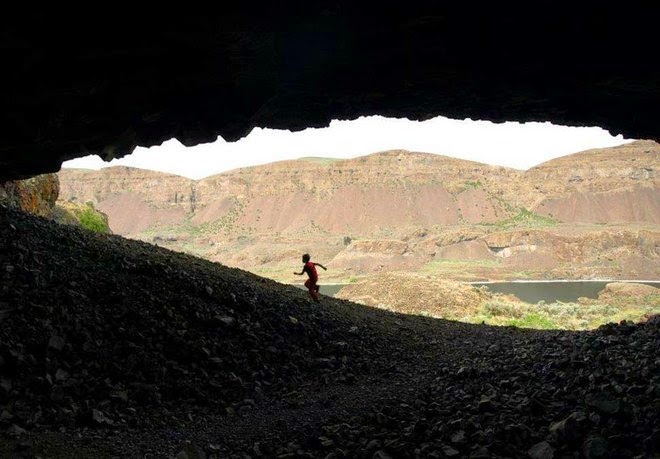
From inside one of the larger caves. This photo is by Susan Elderkin.


You can read more about Lake Lenore Caves.....


by Alan L. Bauer & Dan A. Nelson (The Mountaineers Books)


Prime hiking for fall, winter, and spring; organized by quick access from Spokane, the TriCities and other Washington places. You can buy this book from Amazon.

You can read more at Trails.com.

***************************************************


And, Ta-Da, our winner! Susan, AKA, Suze! 

She won our drawing

 for a free pattern of her choice from Prairie Cottage 

Corner. 

Congratulations Suze!


Saturday, July 26, 2014

!!!!Christmas in July - AGAIN, Please!!!! AND A GIVE-AWAY

Patriotic Sunbonnet Sue has Arrived.....along with Christmas Sue.....

Joan, over at Moose-Stash Quilting has done it again....and again (see below). It truly is Christmas in July around here because our July and Christmas banner samples arrived just this past week Here's Sue with her patriotic banner, all decked out in red, white and blue.


I AM late with these, I admit it. But do you understand the CREATIVE PROCESS? Artists are famous for statements about the creative process, i.e., it can't be forced; it only happens late at night; it can't be interrupted; it can't be....this and that. Really great artists, however, MUST be disciplined. Yes, yes, all that is true. Truth to tell, though, I just DIDN'T FEEL LIKE finishing the July pattern until the end of June, see?


And, now, it's finished and available on our Etsy page as a physical pattern or a PDF Download.

My partner, Erin, and I design and write the patterns for Prairie Cottage Corner. We've been doing this since 2003. When the pattern is ready, we send it to one of our pattern testers, along with fabric, etc., and they make a sample of it, suggesting corrections and changes along the way.


Joan does our samples for us in ALL machine applique'. (Our instructions, in our patterns, include fusible web applique', hand stitched. If you want to do machine applique', use the instructions that come with your machine. I suggest using the button hole stitch, about 1/8" to 1/4" wide for the edges of the fusible. You could also make any of our applique' patterns using Needle Turn and Freezer Paper techniques.)

Here's the pattern cover for July's patriotic Sue.

When finished, the first sample belongs to the pattern tester, but we take it back for a while to photograph it and show it, where possible, in the first year after it's done. After that, the pattern testers get the samples to keep. That's how it works with pattern testers. If you would like to try pattern testing, please write to me, Kathie, direct: prairiestitcher at centurytel dot net and ask about it.

********************************************

And here's the sample for our December Christmas Sue, below.


Stars abound!


The block is easy (as are ALL of our blocks in these banner patterns)....Guaranteed no "Y" seams!


Here's the pattern cover.....


....and our Christmas Eve Pooch!


You can add lace and eyelet to our Sue's dresses easy as pie....

TO ENTER THE GIVE-AWAY TO   WIN THE PATTERN OF YOUR CHOICE    FROM PRAIRIE COTTAGE CORNER:

Just write a comment before Wednesday, July 30th 2014, at 5 PM PDT, answering this question: 

What's your favorite summer fun?

Thanks for stopping by. See you again, soon, I hope.

Thursday, July 10, 2014

"Bless This House" Revisited


"Bless This House" Wall Hanging Pattern


It was Tanya's birthday this past week. She's our blogging, quilter, friend in Japan. If you haven't met Tanya, you must go and visit her. There's a link below.

Well, anyway, it was her birthday and I sent her our little wall hanging pattern, "Bless this House" for a present. Yesterday, she wrote back and sent a picture of her version of it. Wow!


It's very precious. The colors are lovely, warm and vibrant. Sue's carrying a flower instead of her magic wand and she's so dressed up! And look at the fabric Tanya found for Sue's wings! And fussy-cut overskirt and bonnet to match. Will Sue even want to speak to us here at home after this? She's become such a beautifully dressed young woman! From homespun to silk, in the blink of an eye!

Seriously, friends, I love to see what our stitching sisters do with our patterns (besides line the birdcage with them). Every creative effort is a one-off......special.....individual......worthy of praise. Thank you, Tanya, so much.

Tuesday, July 8, 2014

New Pattern - Winter Sports Wall Hanging

 Take advantage of all the Christmas In July fabrics now and make this cute little wall hanging.


It's simple, easy and quick with instructions for fusible web applique.


And an easy, old, snowball block. What could be more simple? 


Sue and her puppy out for a skate.


Easy shapes and pieces. Sounds great, doesn't it, when the temperature is reading 90 degrees in the shade!


"Stay cool", says Sue.

You can buy this pattern as a pdf download or a physical pattern on my Etsy site.

And, when you have a moment, go on over and tell Joan, at Moose Stash Quilting, she did a great job for us on our first sample of this pattern! We love you, Joan. You're the best! Thank you.


DIY Hand-Dandy Quilt Binding Helper - And a WINNER!

This is my DIY Handy-Dandy Quilt Binding Helper - A Box of Kleenex......


....er......well......rather, a Kleenex box. You know how quilt binding can get all twisty as you try to sew it on? It's a mess, unless you take a few minutes at the beginning to carefully wind it into a roll. 

I start by winding the quilt binding, unfolded, onto a long pencil (not a short, stubby pencil). I don't fold and iron the binding lengthwise because by the time it's sewn down and turned to the other side to be blind-stitched, the fold is no longer right on the edge to be hand stitched......so why bother to iron it? Also, finishing the binding is easier without the fold (which is another blog post, altogether, which I haven't written, yet, sorry.)


Then I take my Kleenex box, which I've been using for the past FIVE YEARS....the one with the pencil-sized holes in each side about half way from every side of the box


I put the roll inside the Kleenex box (doesn't matter which way is up - it's not toilet paper!)


See?


I mark the end of the binding 12" from the end all the way across.


And I put a mark, wider than the binding about halfway along one side of the quilt.


I place the box on the floor next to my presser foot. And away we go!


Folding the binding in half, lengthwise and matching the lines, I back stitch a few stitches, and begin sewing the folded binding to the front of the quilt, raw edges to the right. I continue folding and stitching until I get about 1" from a corner.


Then, I measure and mark 1/4" toward the presser foot from the corner edge of the fabric and mark a line I can see. I stitch to the line and stop, lifting the needle and presser foot and pulling out about 5 " of top and bobbin thread but not cutting the thread.


Turn the quilt so you are ready to begin stitching down the next side. With the thread still attached, pull the folded binding straight up in a right angle to the side you just stitched, away from you, then fold it straight toward you, forming a square with the folded edge and right hand raw edge along the edge of the quilt.


Like this.


Then, place the presser foot on the very edge of the quilt and binding and 1/4" from the quilt and binding raw edge, back stitch a few stitches and continue sewing down the side. Repeat this technique for making squared corners at each turn.


On you go! Stay tuned for instructions on seamless binding ends......


Meanwhile, you just might win a prize!

And speaking of prizes! 

Our winner of the drawing for a Prairie Cottage Quilt pattern of her choice, today, is Sandi Timmons!

 Congratulations, Sandi! 

Thank you for all your nice comments and stay tuned for our new contest early next month. 

Meanwhile, back to the drawing board. 

New patterns are on their way to you!