Translate

Showing posts with label fusible interfacing applique'. Show all posts

Friday, October 18, 2013

New Quilt Patterns for Christmas and Winter

"Dashing" is one of our newest quilt wall hanging patterns for winter and Christmas. It's fun to decorate these little projects. With this one, I found some lovely brass bells for the harness of the horse. They really jingle.
These models were machine quilted by Lise Ott at Experience Quilts! quilt shop in Odessa, WA.

This is a pattern for the less-experienced quilter wanting to learn applique' techniques and a little piecing. The directions in all these new patterns are complete for one wanting to learn. These are good patterns for classes in quilting. The projects are small, usually under a yard in dimension, and the shapes are quite simple. The patterns even include the embroidery stitches needed to do the embellishments.


These patterns include instructions for fusible web applique' and freezer paper applique'.


The corner of the blanket is blowing out behind as the pony trots swiftly on, weighted with a little bead and some stem stitching. Below, is the center block for "Midnight Feast", a small wall hanging done in violet batiks, for the most part.


Winter is a hard time for some of our little forest friends. On this frigid night, some bunnies receive a present from Mr. Snowman! He's all decked out for the season.


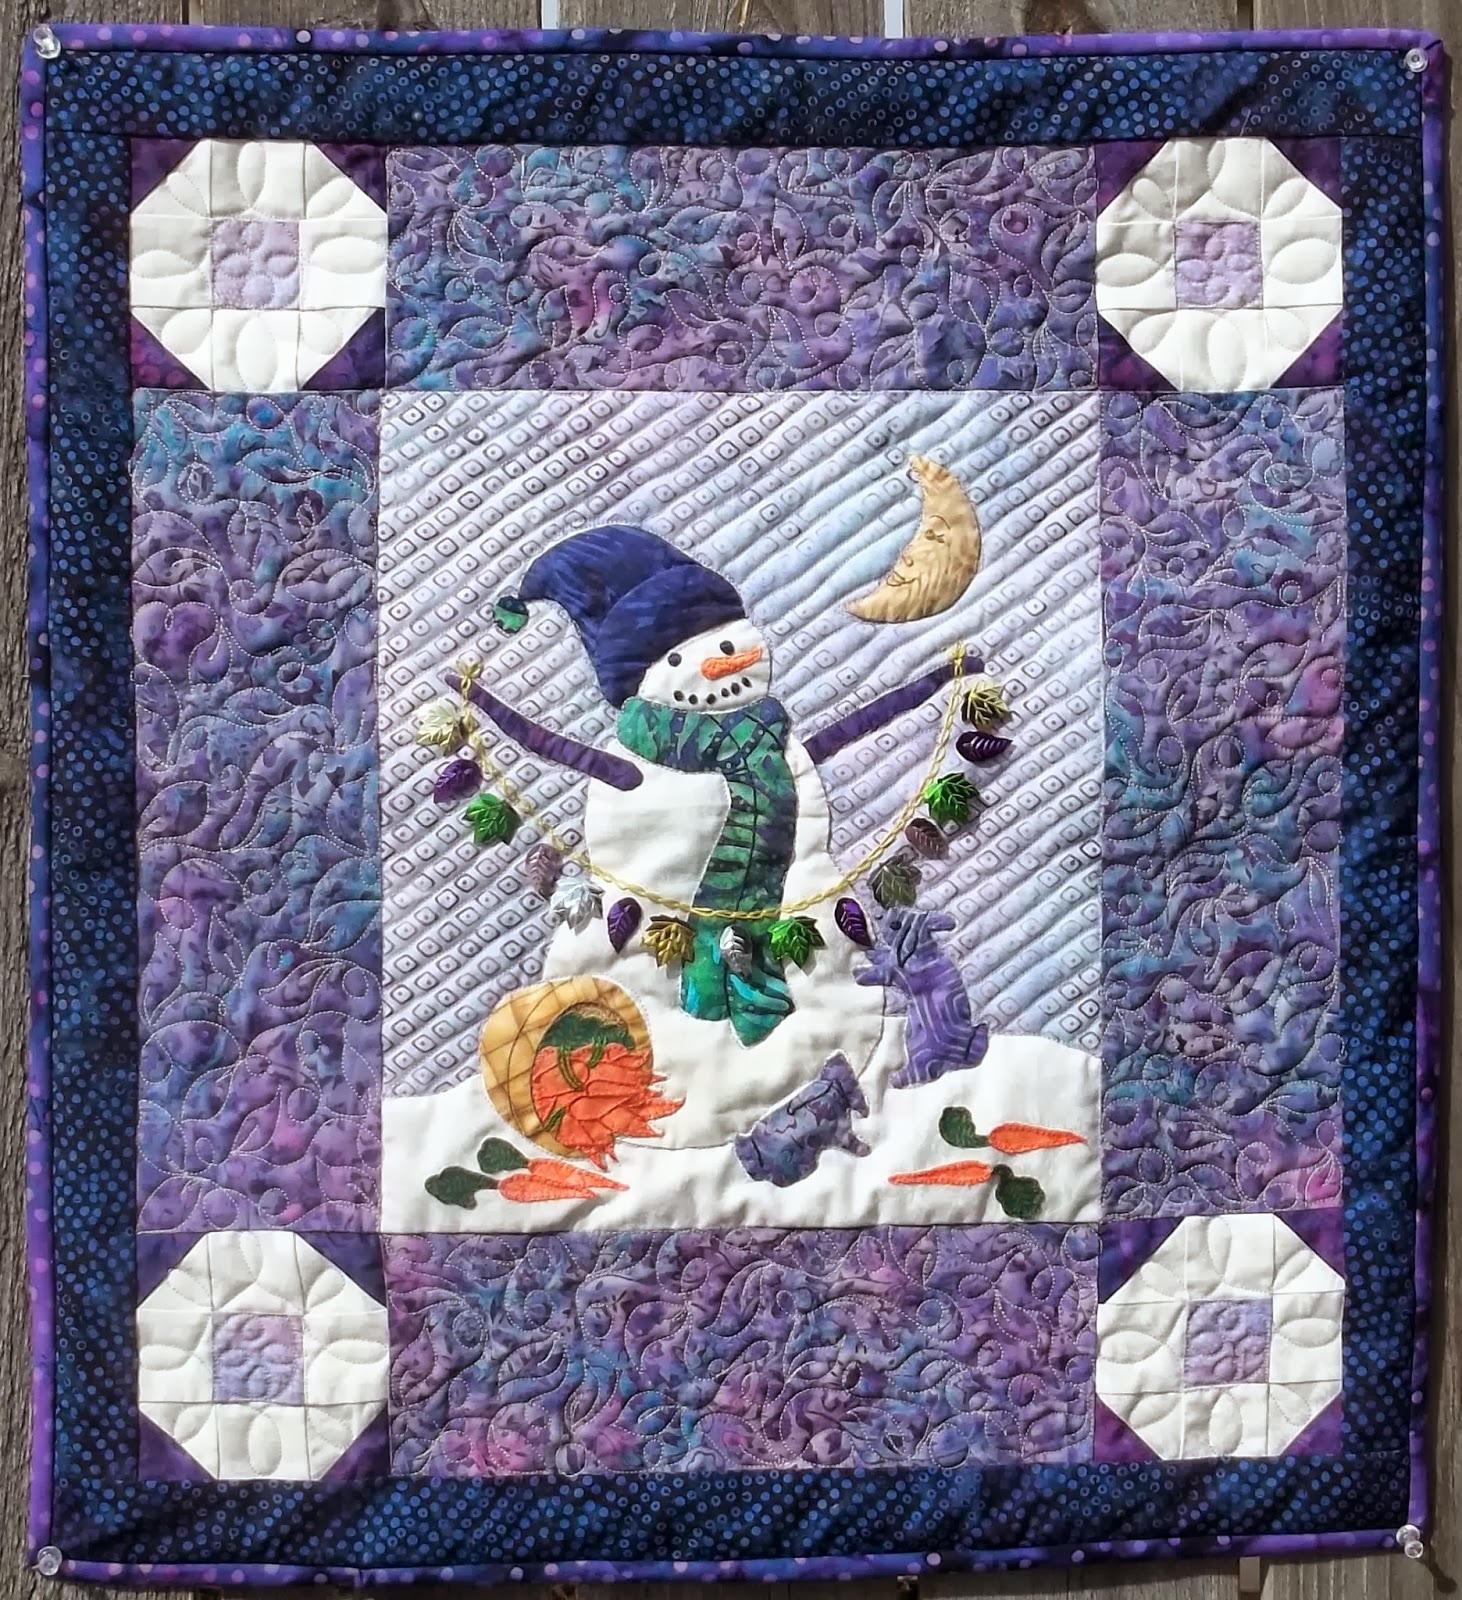
Here's some of the detail work, below, and a complete picture of the center block with borders and snowballs (above).


We used some sequin-like leaves for Mr. Snowman's decorations.


"Twas the Night" is the name of our third winter decorative quilt. The pattern includes the words to Clement Moore's poem as well as a recipe for old-fashioned Sugar Plums (seen dancing over the child's head).


Mom reads to her daughter, warm and cozy.


Here's the whole piece. The blocks for these quilts are simple and the patterns include all the directions needed to assemble them. We hope you enjoyed this preview. You can purchase these 
patterns at Pattern Peddlers. The model for "Dashing" will be at the Fall Market.

Monday, February 27, 2012

8 Great Potholders Embroidery Suggestions


Basic Embroidery Stitches for Appliqué

Over the next little while, I’ll be showing you the stitches I use with my appliqué projects.  Our model today is Sunbonnet Sue with her doll.  This is a 6” potholder design from our pattern, “Eight Great Potholders”.


We’ll be looking at and learning about the Blanket or Buttonhole Stitch, Chain Stitch, Lazy Daisy, Stem Stitch, French Knot and Satin Stitch.  In the Sue, above, you can see all but the Satin Stitch used.  I’ll also include some rarer stitches such as the Ribbed Spider and the Bullion Knot.

The first stitch of importance to appliquérs is the Blanket or Buttonhole Stitch.  This is the stitch that makes a nice, protective edge to your appliqué pieces, whether they are turned edges or raw edges with fusible webbing underneath.


Begin the stitch by going down through the appliqué piece about 1/8” to ¼” from the raw edge and coming up right next to the raw edge.  Always go DOWN through the appliqué piece.  Coming UP through the appliqué piece tends to raise it and may cause its position to shift.

To make your next stitch, go down through the appliqué piece again, about 1/8” to ¼” away from the first stitch, holding your working thread so that when you come up through the background piece at the edge of the appliqué, you are making a loop.  Pull the thread firmly (but not too tight) so that the fabric is not pleated or pinched. 

Continue this way until you need to rethread your needle.  To stop, make a stitch and immediately go down through to the back, anchoring your last stitch.  You can make a small knot or weave the remaining thread through your back stitching to tie it off.

 Here are some examples of how to use this stitch.


Here you see the Blanket Stitch in blue along the edge of Sue’s bonnet, in company with the Lazy Daisy and Chain Stitches.


Here you see it used on the tiny head of her doll as well as on her hand and dress.  This embroidery is over two-sided, fusible webbing.  For small, intricate shapes, the webbing works very well, as you can tell.


Here is the stitch used on her shoes in company with a tiny chain stitch.  We used one strand of embroidery floss here, since the shapes are so small.  These potholders bear up well with use but I see a lot of people just hanging them in the kitchen as decorations.  The embroidery does make them a little precious, I think.  I love appliqué with embroidery.


Here is the back of Sue’s dress and a bit of the sleeve with almost all the stitches in view.  They work very well together.


I hope you enjoy using these stitches.  I think I’ll give this pattern away for our next drawing coming up.
Happy Stitching!

Saturday, February 18, 2012

"Simply Sue" - A great way to
 welcome SPRING!

Don't forget to leave a comment.  When you do, you are automatically entered for a chance
 to win a free pattern (below).

Yes, I said SPRING!  It's high time we looked  Old Man Winter in the eye and said it:  SPRING! SPRING! SPRING! SPRING!

So there!  I've put our "Simply Sue" pattern on sale this week at 30% off, in celebration of the Spring that must surely come soon.  That's a savings of $3.00.

Here's the "Simply Sue" quilt hanging in The Quilt Crossing in Odessa, WA
The pattern is really simple - you can do as much or as little embellishment as you want.  I like embroidery, so use it for all the small things like the shoes, flowers and accessories.

Here, I used some fabric pens to "paint" the baby doll face and blanket.  I added some eyelet for the petticoat and hat; and embroidery for the flower.  It's fun.
I hope you will try this pattern for yourself.  You can do all kinds of things with it.  Here it is in pastels AND crayon colors:

                                  
Happy Stitching - Visit Prairie Cottage Corner Store to buy this pattern.

Sunday, September 27, 2009

Looking for the Perfect Sue?

I had seen these pre-made Sunbonnet Sues on Ebay several times last year when I finally decided to buy a set of them and see if they were really as beautiful as they looked in the pictures. So I bought a set and when they came, I was so happy. There were 12 in a set; good cotton fabric of quilt quality sewn very carefully all around the edges to one-sided fusible (slit in back and turned inside-out).

I called the set I bought, Hawaiian Sue, and made a twin quilt from them which I showed in the Odessa Spring Fling quilt show this year. It was my first attempt to produce anything that could be shown. As it turned out, I actually showed the Hawaiian Sue, Green Thumb Sue, and Sunday Sue quilts.


The Hawaiian Sue set and all the other lovelies on Ebay of this sort are made by Norma Downing of the Tri-Cities area of Washington State. Her email address is downing2@verizon.net

She makes all kinds of Sues for quilts and will do custom designs as well. The Sues I received came pinned together. Each figure had five pieces and they were exquisite. I hand-stitched them to the block on point, then machine-pieced the alternating blocks to make the whole quilt top.

Susan Ryan, a wonderful professional quilter (her email address is dbltapmomma2@gmail.com), quilted it for me making huge flowers in the alternate blocks to match a lily design in one of the Sue dresses. Then, she echo-quilted the Sues. A vine quilt stitch was used in the borders. It's my favorite Sue quilt, so far and very easy to make. I'm just getting ready to release the pattern for it this next month.

Be sure to look on Ebay or Etsy for Norma Downing's Sues. They are really wonderful. And, if you want a really good quilter person who is artistic and easy to work with, send your quilts to Susan. Happy Stitching!